Rate Limiter
- 文章發表於
Introduction
Rate limiters play an indispensable role in modern software architecture. They act as a protective barrier, preventing software services from being abused or attacked, ensuring system stability while guaranteeing fair usage rights for all users.
Imagine a software service provider with hundreds of millions of users, such as ChatGPT or x.com. Without rate limiting protection, the system could be easily abused by a single user or malicious program, monopolizing hardware resources or even causing system crashes that degrade the experience for other users. Rate limiters ensure that every user gets fair access to resources, maintaining overall system performance stability while preventing any single user from monopolizing resources or being targeted by malicious attacks.
The main benefits of using rate limiters include:
- Preventing Abuse: Malicious users may attempt to disrupt normal system operations through excessive requests (e.g., DoS attacks) or API abuse (e.g., artificial flooding, excessive data scraping).
- Resource Management: Ensures backend services don't become overloaded by excessive requests, maintaining system stability and availability for all users to have a good experience.
- Fair Usage: Allows all users to access resources fairly, preventing a few high-traffic users from monopolizing resources and affecting service quality for others.
- Cost Control: In cloud environments, excessive requests can lead to high operational costs; rate limiting mechanisms help effectively control and manage these costs.
Process Overview
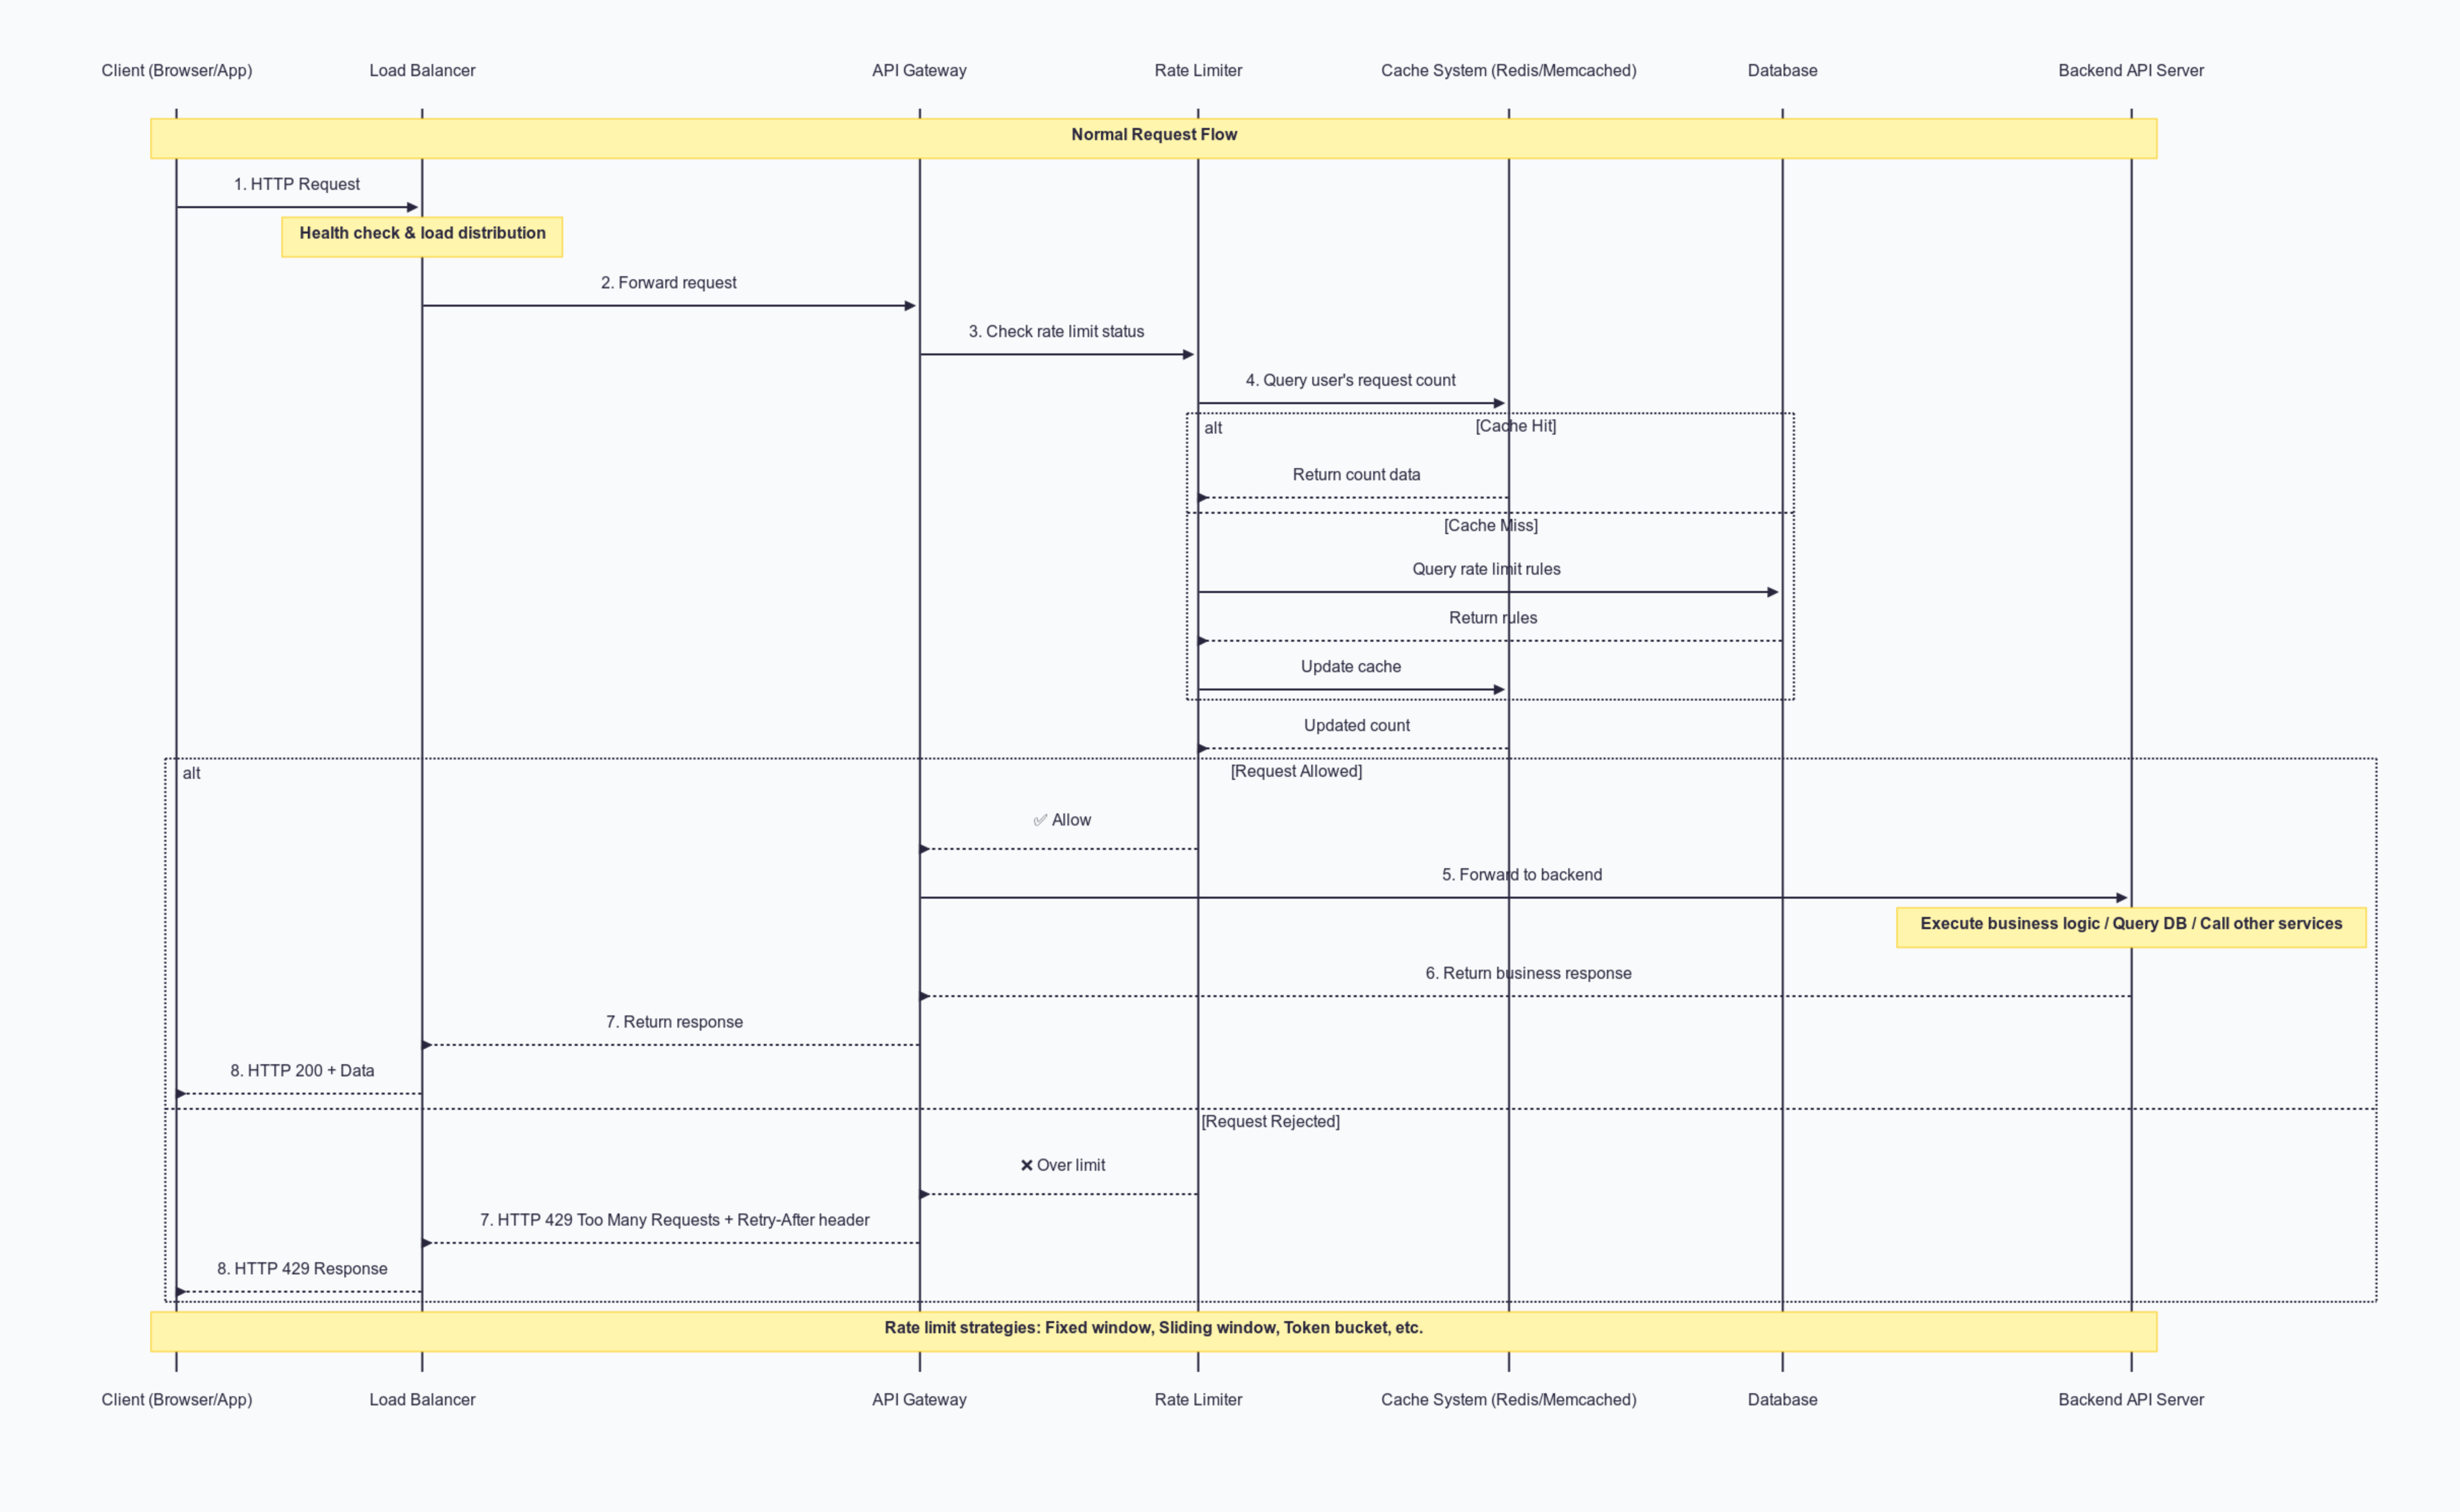
With a rate limiter in place, the overall user flow looks like this:
- Client Sends Request A user (via browser or mobile app) sends an HTTP request.
- Load Balancer Receives Request The load balancer performs health checks and distributes the request to available API Gateway nodes.
- API Gateway Forwards to Rate Limiter Before any backend processing, the API Gateway sends the request to the rate limiter.
- Rate Limiter Checks Usage Data The rate limiter queries a cache system (e.g., Redis or Memcached) to get the current request count for that user. If no data exists in cache, it may query the database for rate limiting rules and update the cache.
- Decision: Allow or Deny
- Allow – The rate limiter notifies the API Gateway to continue processing the request.
- Deny – The rate limiter notifies the API Gateway to immediately return an HTTP 429 Too Many Requests error, optionally including a
Retry-Afterheader to indicate when the client can try again.
- Forward to Backend API (if allowed) The API Gateway forwards the request to backend API servers to execute business logic, query databases, or call other services.
- Return Response to Client The API response returns to the client through the API Gateway and load balancer.
This article will focus on implementing common rate limiting algorithms and building a simple rate limiter.
Implementation
As discussed in previous explorations of rate limiters, the core purpose of designing a rate limiter is to prevent single-user resource abuse, handle malicious attacks, and manage costs. But how do we actually translate these concepts into code?
Before diving into implementation, let's consider: what elements do we need, and what information should we return?
For example, readers who have used Claude or ChatGPT have likely encountered rate limiting. When you exceed usage limits, you'll see messages like "You've exceeded your usage limit, please try again after X time" or "You have X requests remaining, next refresh at Y date" when approaching limits.
To achieve this effect, the backend needs to use HTTP status codes (e.g., 429 Too Many Requests) along with headers (like X-RateLimit-Limit, X-RateLimit-Remaining, X-RateLimit-Reset, or Retry-After) to inform the client whether the user is being rate limited and their remaining quota. By detecting status codes or reading relevant headers, the client can display appropriate messages to the user.
An ideal rate limiting response should include these fields:
{success: boolean, // Whether this request is allowed to proceedlimit: number, // Maximum allowed requests in current time windowremaining: number, // Remaining available requestsreset: number, // Unix timestamp when current time window resetspending: Promise // Background processing tasks (e.g., data sync or cache cleanup)}
This unified data structure allows clients to determine whether to show warning messages or automatically schedule retries when needed.
Basic Architecture
A rate limiter's basic functionality typically includes: setting request limits for specific periods, choosing rate limiting algorithms, and custom storage. We'll use the Strategy Pattern to let developers using the package specify their preferred algorithm.
We'll cover these common rate limiting algorithms:
- Fixed Window
- Sliding Window Log
- Sliding Window Count
- Token Bucket
Implementation Framework
/*** Main class for applying rate limiting.* Uses strategy pattern to allow different rate limiting algorithms at runtime.*/class RateLimit {/*** @param {object} config - Rate limiter configuration object.* @param {function} config.limiter - Specific rate limiting algorithm function (generated by static methods).* @param {RedisMap} [config.storage] - (Optional) Storage instance for state, defaults to new RedisMap.* @param {number} [config.delay] - (Optional) Milliseconds to simulate network delay.*/constructor(config) {this.limiter = config.limiter;this.storage = config.storage || new RedisMap();this.delay = config.delay || 10; // Default simulated delay}/*** Applies configured rate limiting to given identifier.* @param {string} identifier - Unique identifier for the limited entity (e.g., user ID, IP address).* @returns {Promise<object>} Promise resolving to object with success/failure and limit details.* @example* const result = await rateLimiter.limit("user-123");* // result: { success: boolean, limit: number, remaining: number, reset: number }*/async limit(identifier) {return await this.limiter(this.storage, identifier, this.delay);}/*** Limits requests within fixed, non-overlapping time windows.* @param {number} tokens - Maximum allowed requests per window.* @param {string} window - Time window duration (e.g., "60s", "1m").* @returns {function} Rate limiter function for RateLimit constructor.*/static fixedWindow(tokens, window) {const windowDuration = parseWindow(window);return async (storage, identifier, delay) => {// Algorithm implementation...};}/*** Approximates a sliding window by weighted calculation of current and previous fixed windows.* @param {number} tokens - Maximum allowed requests per window.* @param {string} window - Time window duration (e.g., "60s", "1m").* @returns {function} Rate limiter function.*/static slidingWindow(tokens, window) {const windowDuration = parseWindow(window);return async (storage, identifier, delay) => {// Algorithm implementation...};}/*** Allows burst requests up to bucket capacity, refilling tokens at fixed rate.* @param {number} refillRate - Number of tokens refilled per interval.* @param {string} interval - Token refill interval (e.g., "1s", "10s").* @param {number} maxTokens - Maximum tokens the bucket can hold.* @returns {function} Rate limiter function.*/static tokenBucket(refillRate, interval, maxTokens) {return async (storage, identifier, delay) => {// Algorithm implementation...};}/*** Maintains a log of request timestamps within a sliding window.* @param {number} tokens - Maximum allowed requests per window.* @param {string} window - Time window duration (e.g., "60s", "1m").* @returns {function} Rate limiter function.*/static slidingWindowLog(tokens, window) {return async (storage, identifier, delay) => {// Algorithm implementation...};}}
Fixed Window
As the name suggests, fixed window divides time into fixed-length "time windows" (e.g., per minute, per hour) and tracks cumulative requests within each window. When one time window ends and a new one begins, the previous window's counter automatically resets to zero.
The overall process:
- We receive two parameters:
tokens: Maximum allowed requests in this time window.window: Window length in milliseconds, e.g., 1m (one minute).
- Calculate the current request's bucket
- Combine
identifier(e.g., user ID, API key) with bucket to create unique key, then read current request count from storage (Redis/Memcached). - Check if quota is exceeded
- If current cumulative requests ≥ tokens, quota is full, reject request.
- If current cumulative requests < tokens, more requests can be allowed, increment bucket count, return success.
- Automatic reset
When moving to a new bucket, old bucket numbers are naturally phased out, and their counters are no longer used; new bucket counters start from zero.
Most of this involves checking values to decide whether to reject or accept requests, then updating values. The main challenge: how to efficiently track "request count within specific time window" without storing every request's timestamp?
const bucket = Math.floor(Date.now() / windowDuration);
This approach eliminates the need to store every request timestamp—we can calculate the current request's bucket using current time and window length.
Benefits:
- Global consistency: All requests in the same time interval fall into the same bucket.
- Automatic expiration: When bucket numbers advance, past buckets are naturally no longer used.
O(1)operations: No need to scan entire timestamp arrays, just calculate bucket number directly.
class RateLimit {...static fixedWindow(tokens, window) {const windowDuration = parseWindow(window);return async (storage, identifier, delay) => {// 1. Calculate current request's bucketconst currentBucket = Math.floor(now / windowDuration);const key = `${identifier}:${currentBucket}`// 2. Read tokens used in this bucket (default to 0 if not exists)const previousTokens = storage.get(key) || 0;const reset = (currentBucket + 1) * windowDuration;// 3. Reject if already at capacityif (previousTokens > tokens) {return { success: false, remaining: 0, limit: tokens, reset }}// 4. Not exceeded, increment and update storageconst currentTokens = previousTokens + 1;// 5. Set expiration if first write to this bucketif (currentTokens === 1) {storage.pexpire(key, Math.floor(windowDuration * 1.5))}storage.set(key, currentTokens)return { success: true, limit: tokens, remaining: tokens - currentTokens, reset }};}...}
Advantages:
- Simple implementation: Clear logic, easy to understand and implement.
- Memory efficient: Only need to maintain one counter per limited entity (e.g., user ID or IP address) in current time window.
- Low computational overhead: Counting and reset operations are typically fast.
Disadvantages:
- Window boundary effect / critical section problem:
This is the algorithm's main flaw. At window boundaries, actual traffic rates can exceed set average rates. For example, with 100 requests per minute limit, a user could send 100 requests at 0:00:59 (allowed), then another 100 at 0:01:00 (new window starts, also allowed). This means 200 requests processed in seconds, potentially overwhelming backend services. - Unsmooth traffic: Counters reset at each window start, potentially causing traffic bursts at window beginnings.
Sliding Window Log
Sliding window aims to solve fixed window's flaws by allowing smooth traffic transitions at window boundaries, preventing sudden bursts. It records each request's arrival timestamp. When a new request arrives, the system checks all request timestamps within the past "sliding time window" (e.g., past 60 seconds). If timestamp count exceeds the preset threshold, the new request is rejected.
class RateLimit {...static slidingWindow(tokens, window) {const windowDuration = parseWindow(window);return async (storage, identifier, delay) => {const now = Date.now();const key = `log:${identifier}`;// 1. Get stored timestamp array, use empty array if not existslet timestamps = storage.get(key) || [];// 2. Filter out "out-of-window" timestamps (<= now - windowDuration)const windowStartTime = now - windowDuration;timestamps = timestamps.filter(ts => ts > windowStartTime);// 3. Reject if already at tokens requests in this window// earliest = timestamps[0]if (timestamps.length >= tokens) {// Calculate next available time: earliestTimestamp + windowDurationconst resetTime = timestamps[0] + windowDuration;// Store "filtered array" back, set TTLstorage.set(key, timestamps);// Add 1000ms (1 second) to ensure key doesn't expire prematurely due to edge cases (network delay, execution time)storage.pexpire(key, windowDuration + 1000);return {success: false,limit: tokens,remaining: 0,reset: resetTime};}// 4. Not at limit, push now and store backtimestamps.push(now);storage.set(key, timestamps);storage.pexpire(key, windowDuration + 1000);// 5. Calculate remaining quota and reset timeconst remaining = tokens - timestamps.length;// Recalculate earliestTimestamp + windowDuration as resetconst reset = timestamps[0] + windowDuration;// 6. FOR DEV PURPOSE, simulate background work with delayif (delay) {await new Promise(resolve => setTimeout(resolve, delay));}return {success: true,limit: tokens,remaining,reset};};}...}
Advantages:
- Precise traffic control: Can very accurately limit request counts in any given time period, effectively avoiding fixed window boundary effects.
- Smooth traffic: Continuous sliding windows provide smoother traffic control.
Disadvantages:
- High memory consumption: Requires storing every request timestamp, significant memory overhead with high request volumes.
- High computational cost: Each request requires cleaning and counting timestamp lists, potentially becoming performance bottlenecks under high concurrency.
Sliding Window Count
Sliding window count aims to combine fixed window counters' low memory consumption with sliding window logs' smooth traffic control. It maintains request counts for current and previous time windows, calculating an approximate total requests within sliding window based on current time position.
Overall process:
- Time slicing and counters: Similar to fixed window, time is divided into fixed-length windows with counters maintained for each.
- Approximate sliding count: When new request arrives, it considers both current window (currentWindowCount) and previous window (previousWindowCount) requests.
- Approximate total = (previousWindowCount * overlap ratio) + currentWindowCount
- "Overlap ratio" refers to how much of previous window still falls within current "sliding window". For example, with 60-second window and current time 1:00:15 (25% into current window), previous window (0:59:00-1:00:00) has 45 seconds (75%) still within past 60-second sliding window.
- Limit check: If approximate total < threshold, allow request and increment current window counter; otherwise reject.
Example (assume 100 requests per 60 seconds limit, 60-second window length):
- Window 1 (0:00:00 - 0:01:00): 80 requests received,
count_window1 = 80 - Window 2 (0:01:00 - 0:02:00):
- At 0:01:15 (25% into current window):
- Previous window contribution ratio = (60 - 15) / 60 = 45 / 60 = 75%
- Assume window 2 already has 10 requests (
count_window2 = 10) - Approximate sliding total = (count_window1 × 75%) + count_window2 = (80 × 0.75) + 10 = 60 + 10 = 70
- 70 < 100, request allowed
- At 0:01:45 (75% into current window):
- Previous window contribution ratio = (60 - 45) / 60 = 15 / 60 = 25%
- Assume window 2 already has 50 requests (
count_window2 = 50) - Approximate sliding total = (count_window1 × 25%) + count_window2 = (80 × 0.25) + 50 = 20 + 50 = 70
- 70 < 100, request allowed
- At 0:01:15 (25% into current window):
class RateLimit {...static slidingWindow(tokens, window) {const windowDuration = parseWindow(window);return async (storage, identifier, delay) => {const now = Date.now();// 1. Calculate "current" and "previous" bucketsconst currentBucket = Math.floor(now / windowDuration);const previousBucket = currentBucket - 1;const currentKey = `${identifier}:${currentBucket}`;const previousKey = `${identifier}:${previousBucket}`;// 2. Get each bucket's token count (default 0)const currentTokens = storage.get(currentKey) || 0;const previousTokens = storage.get(previousKey) || 0;// 3. Calculate weighted token count from previous bucketconst elapsed = now % windowDuration;const overlapRatio = 1 - (elapsed / windowDuration);const weightedPrevious = Math.floor(previousTokens * overlapRatio);// 4. Calculate total tokens in sliding windowconst totalTokens = currentTokens + weightedPrevious;const reset = (currentBucket + 1) * windowDuration;// 5. Check if quota exceededif (totalTokens >= tokens) {return {success: false,limit: tokens,remaining: 0,reset};}// 6. Not exceeded, increment current bucket tokens and update storageconst newCurrentTokens = currentTokens + 1;storage.set(currentKey, newCurrentTokens);// 7. Set TTL if first writeif (newCurrentTokens === 1) {// Set TTL to windowDuration * 2 + 1000 to ensure previous bucket hasn't expiredstorage.pexpire(currentKey, Math.floor(windowDuration * 2 + 1000));}// 8. Calculate new remaining countconst newTotalTokens = newCurrentTokens + weightedPrevious;const remaining = Math.max(0, tokens - newTotalTokens);// 9. FOR DEV PURPOSE, simulate background delayif (delay) {await new Promise(resolve => setTimeout(resolve, delay));}// 10. Return success messagereturn {success: true,limit: tokens,remaining,reset};};}}
Advantages:
- Smooth traffic: Compared to fixed window counting, sliding window count effectively reduces burst traffic at window boundaries, providing smoother rate limiting.
- Memory efficient: Only needs to store current and previous window counts, requiring much less memory than sliding window log.
- Moderate implementation difficulty: Simpler than sliding window log, only slightly more complex than fixed window counting.
Disadvantages:
- Only approximate: Not as precise as sliding window log, may have errors with extreme traffic distributions.
- Requires precise overlap calculation: Must correctly calculate window overlap ratios and properly maintain two window counts.
Token Bucket
The token bucket concept treats each request as taking a token from a "token bucket." The system adds tokens to this bucket at a constant rate. Each incoming request must first obtain a token from the bucket to be processed. If sufficient tokens are available, the request is processed immediately; if tokens are insufficient, the request is rejected, queued, or handled with other degradation strategies.
class RateLimit {...static tokenBucket(refillRate, interval, maxTokens) {const intervalDuration = parseWindow(interval);return async (storage, identifier, delay) => {const now = Date.now();const key = `token:${identifier}`;// 1. Get current bucket state, default to full bucketlet bucketData = storage.get(key) || {tokens: maxTokens,lastRefillAt: now,};// 2. Calculate time passed since last refillconst timePassed = now - bucketData.lastRefillAt;// 3. Calculate how many refills should occurconst refills = Math.floor(timePassed / intervalDuration);// 4. Refill tokens based on refill countlet currentTokens = bucketData.tokens;let newLastRefillAt = bucketData.lastRefillAt;if (refills > 0) {currentTokens = Math.min(maxTokens,bucketData.tokens + refills * refillRate);newLastRefillAt = bucketData.lastRefillAt + refills * intervalDuration;}// 5. If insufficient tokens, reject request, calculate next available timeif (currentTokens < 1) {const timeSinceLastRefill = now - newLastRefillAt;const timeToNextRefill = intervalDuration - (timeSinceLastRefill % intervalDuration);const reset = now + timeToNextRefill;storage.set(key, {tokens: currentTokens,lastRefillAt: newLastRefillAt,});storage.pexpire(key, Math.max(intervalDuration * 5, parseWindow("1h")));return {success: false,limit: maxTokens,remaining: 0,reset,};}// 6. Sufficient tokens, consume 1const tokensLeft = currentTokens - 1;storage.set(key, {tokens: tokensLeft,lastRefillAt: newLastRefillAt,});storage.pexpire(key, Math.max(intervalDuration * 5, parseWindow("1h")));// 7. Simulate delayif (delay) {await new Promise(resolve => setTimeout(resolve, delay));}// 8. Calculate next refill timelet reset;if (tokensLeft < maxTokens) {const timeSinceLastRefill = now - newLastRefillAt;const timeToNextRefill = intervalDuration - (timeSinceLastRefill % intervalDuration);reset = now + timeToNextRefill;} else {reset = now;}return {success: true,limit: maxTokens,remaining: tokensLeft,reset,};};}}
Algorithm Comparison